Postback tracking in AdsBridge
To setup your AdsBridge postback URL login to the AdsBridge tracking platform and select ‘Affiliate Networks/Create affiliate network’.
Choose your ‘Affiliate Networks Template’ which is provided by AdsBridge or manually enter your own network configuration.
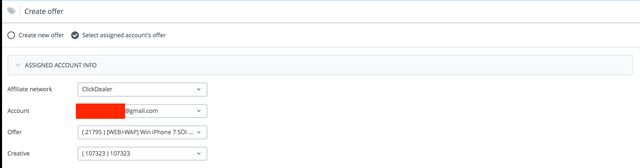
Click the ‘Offers’ menu then select ‘Create offer’.
Make sure ‘Select assigned accounts offer’ is ticked.
Under ‘Assigned Account Info’ select your Affiliate network, Account, Offer and Creative.
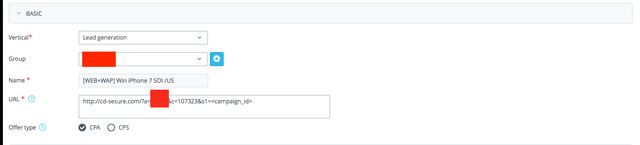
Next under the ‘Basic’ menu select your ‘Vertical’ and ‘Group’ to keep everything organised. AdsBridge automatically adds the name of your offer but it falls short of adding the affiliate networks Offer ID to the ‘Name’ menu. I highly recommend adding your Offer ID to the title so its clear what offer you are running later.
Tip: You can quickly get your Offer ID from the above ‘Offer’ menu without leaving the page.
Also under the ‘URL’ menu you can optionally click to add the <campaign_id> to your s1 tracking token.
Now select your Offer type. This will be either Cost-Per-Action or Cost-Per-Sale.
Under ‘Advance’ menu AdsBridge will automatically tick ‘Campaign tokens’ and add your Tracking token and your Payout.
If your Offer is capped its a good idea to come back later and enter a value in ‘Daily cap’ menu and setup a redirect to a similar offer.

Under ‘Postback Settings’ menu you will notice that AdsBridge will show you your current postback url from your affiliate network if any under ‘Current Postback URL’. If none is set AdsBridge can automatically setup your postback url with your affiliate network by clicking the ‘Set Postback Url’ button under ’Postback URL to set’. This is a great time saver.
Finally click the ‘Save’ button.

If you made it this far, you have now successfully setup an offer with AdsBridge. The next step is to create a campaign.